Table of Contents
- Out of Date
- Setup
- Creating a Supabase Client and Auth Store
- Create a Redirect Handler Route
- Sign In Handler
- Sign Out Handler
- Using the Access Token
- Conclusion
Out of Date
The information in this article is out of date. It is recommended to use @supabase/auth-helpers-sveltekit going forward. This method will still work, however.
Setup
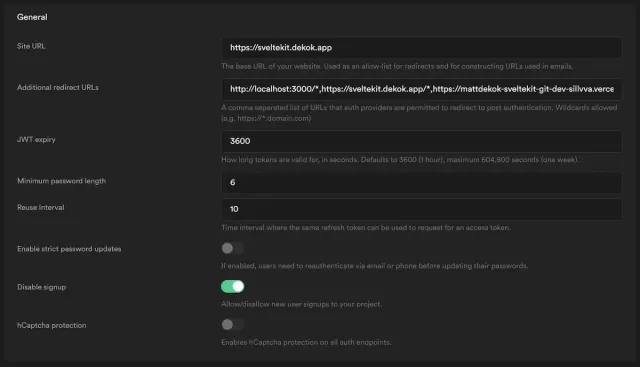
In Supabase, go to your Authentication Settings and make sure you have set your Site URL and Additional Redirect URLs.

Then scroll down and select your preferred auth provider(s).

Finally, go to your Supabase API Settings and get your Project URL and Anon Key. Store them in environment variables like so:
# .env.local
SUPABASE_URL=
SUPABASE_ANON_KEY=
Creating a Supabase Client and Auth Store
Create a new file in your $lib directory for your Supabase Client. In here, you’ll do four things: create a supabase client, create a store to hold the auth state, watch for auth state changes, and subscribe to expiring access tokens.
The auth subscription is a timer to watch for expiring access tokens and refresh them. Supabase provides a refresh token and a timestamp when the token will expire. You can use this to set a timer that will trigger a token refresh prior to the token expiring. If it is successful, you’ll receive a new session state, access token, refresh token, etc. Store the new session state into your $auth store.
// $lib/supabase/client.ts
import { createClient } from "@supabase/supabase-js";
import type { Session } from "@supabase/supabase-js";
import { goto } from "$app/navigation";
import { env } from "../constants";

// Create the supabase client
export const supabase = createClient(env.SUPABASE_URL, env.SUPABASE_ANON_KEY);

// Auth state, initialize to null
export const auth = writable<Session | null>(null);

// Watch for auth events and store session information into the auth store
supabase.auth.onAuthStateChange((event, session) => {
  if (event === "SIGNED_IN") {
    auth.set(session);
  }
  if (event === "SIGNED_OUT") {
    auth.set(null);
    goto("/");
  }
});

// Refresh token timer
let authExpiresAt = 0;
let refreshTimer: NodeJS.Timeout | null = null;
auth.subscribe((session) => {
  // Do we have a new token with a fresh expiration time?
  if (session && session.expires_at && session.expires_at !== authExpiresAt) {
    authExpiresAt = session.expires_at;
    // Calculate the timer to within 10 minutes of the expiration timestamp
    const now = new Date().getTime();
    const timer = Math.max(1, authExpiresAt - now / 1000 - 10 * 60) * 1000;
    console.log("Refresh at", new Date(now + timer));
    console.log("Expires at", new Date(authExpiresAt * 1000));
    // Create the timer
    if (refreshTimer) clearTimeout(refreshTimer);
    refreshTimer = setTimeout(async () => {
      let newSession: Session | null = null;
      if (session?.refresh_token) {
        // Refresh the access token
        newSession = (
          await supabase.auth.signIn({
            refreshToken: session.refresh_token,
            provider: "github"
          })
        )?.session;
      }
      if (newSession) auth.set(newSession);
    }, timer);
  }
});
Create a Redirect Handler Route
This step is only necessary if authenticating with a third-party OAuth provider. When the OAuth provider returns to the app, I’ve noticed it causes weird layout shifts if you redirect directly to a protected route. To resolve this issue, I’ve created a redirect handler route that redirects once the auth session has been detected and stored.
<!-- src/routes/redirect.svelte -->
<script lang="ts">
import { page } from "$app/stores";
import { goto } from "$app/navigation";
import { auth } from "$lib/supabase/connection";
import PageMessage from "$lib/components/page/message.svelte";

let redirect = $page.url.searchParams.get("to") || "/";
let isAuthRedirect = $page.url.searchParams.get("auth");

$: {
  // If this is an auth redirect, wait until the $auth state is detected.
  if (isAuthRedirect) {
    if ($auth) goto(redirect, {
      replaceState: true
    });
  }
  // Otherwise, redirect immediately.
  else {
    goto(redirect, {
      replaceState: true
    })
  }
}
</script><PageMessage>
<p>You are being redirected to:</p>
<pre>{redirect}</pre>
</PageMessage>Sign In Handler
I have used this implemented an automatic sign-in handler that will attempt to authenticate the user upon loading a protected route. However, you can use an event handler to do the same on a button press as well.
In my protected route layout, I use the following code to handle authentication.
<!-- src/routes/protected/__layout.svelte= -->
<script lang="ts">
import { onMount } from "svelte";
import type { User } from "@supabase/supabase-js";
import { supabase, auth } from "$lib/supabase/connection";
import { page } from "$app/stores";

let user: User | null = null;

onMount(async () => {
  if ($auth) user = $auth.user;

  if (!user) {
    return await supabase.auth.signIn(
      {
        provider: "google"
      },
      {
        redirectTo: `${$page.url.origin}/redirect?to=${encodeURIComponent($page.url.pathname)}&auth=1`
      }
    );
  }
});
</script>{#if user}
<slot />
{:else}
<PageMessage>Authenticating</PageMessage>
{/if}Sign Out Handler
Signing out is even more straightforward.
<button on:click={() => supabase.auth.signout()}>Sign Out</button>Using the Access Token
Once you’ve logged in, and stored the session state into the $auth store, you can use the provided access token to validate requests on protected routes and APIs. You do so as you normally would be passing an Authorization header with a value like Bearer ACCESS_TOKEN. Here is an example:
// src/routes/protected/page.svelte
const response = await fetch("/protected/data", {
  method: "POST",
  headers: {
    authorization: `Bearer ${$auth?.access_token}`
  },
  body: formData
});
Then inside the endpoint, you would verify the token like this:
// src/routes/protected/data.ts
import type { RequestHandler } from "./__types/data";
import type { User } from "@supabase/supabase-js";
import { supabase } from "$lib/supabase/connection";

export const get: RequestHandler<OutputType> = async ({ request, url }) => {
  // Get access token
  const token = request.headers.get("authorization")?.replace("Bearer ", "") ?? "";
  // Validate access token and get user information
  const { user, error } = await supabase.auth.api.getUser(token);
  // Return error if the token is invalid or expired
  if (!user) return getError(`Unauthorized: ${error}`, 401);
  // Authenticate the requests
  supabase.auth.setAuth(token);

  // Fetch and return data
  const select = url.searchParams.get("select");
  return getResult(select);
};
When a 401 Unauthorized error is returned, the token has expired, and the user should be redirected to the home or login screen.
Conclusion
And that’s it! You now have authentication and protected routes.
